Brewzilla Gen4 Discussion/Tips Talk

Homebrew Talk - Beer, Wine, Mead, & Cider Brewing Discussion Forum

Help Support Homebrew Talk - Beer, Wine, Mead, & Cider Brewing Discussion Forum:

This site may earn a commission from merchant affiliate links, including eBay, Amazon, and others.
Thanks, my plan was to try this, and it makes perfect sense as to why it overshoots. Definitely think kegland could come up with some sort of algorithm to solve this.
I can relate to your experience.

I followed a recommendation to set the differential at 9°F, which I believe equates to 5°C (4°F was the default). My target mash temperature was 152°F, but it topped out at 159.8°F before dropping.

From my experience so far, the higher the offset the more you're going to overshoot when you're ramping up to a target temperature. If you have ever done an infusion mash in a cooler, this will make sense when you think about it.

For the last two batches, I landed on a 2°F (1.1°C) when I'm mashing. The trade-off is that it takes longer to ramp up between each step, but the overshoot when you reach your target is much, much smaller. At this setting, I only over shot by 1.3°.

I hope this helps you.
 
Is there any technical information available for the Gen4 that would help with troubleshooting? A schematic of the circuit board or even just labels for the screw terminals on it would be useful.

I'm trying to find out if my Gen4 35 is salvageable. I had it plugged in, empty with the heater off, while looking at the settings in the controller (and making yet one more fruitless attempt to get a firmware update). We had a brief power failure, and not long after the power came back on, the room was full of acrid smoke with all the smoke alarms in the house going off. After I unplugged the Brewzilla, I noticed that the legs supporting the plastic circuit board enclosure were completely melted off from the kettle bottom.

I’d definitely like to know where the over temperature cutout is physically located (and why it failed to protect).
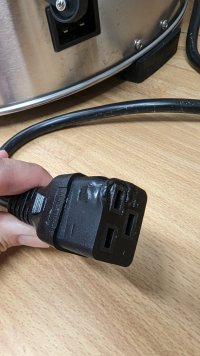
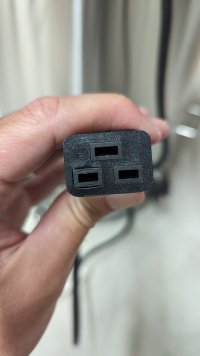
I've had a similar experience during my first batch. While cleaning my BZ 65l gen 4 (recirculating 70c water) my RAPT panel flashed white and would not show any information or response to the buttons. I then pulled the plug and saw that the power cord had melted.

Talked to my reseller who gave me a new power cord and said we should try with that in first place. Heated up 15l of water to ~70c, pulled the plug and it had already then begun to melt. See attached pictures.

So im waiting for resellers response of changing the unit.
 

Attachments

  • PXL_20230620_154347000.jpg
    PXL_20230620_154347000.jpg
    1.7 MB · Views: 0
  • PXL_20230706_140517475.jpg
    PXL_20230706_140517475.jpg
    1.5 MB · Views: 0
Last edited:
I've had a similar experience during my first batch. While cleaning my BZ 65l gen 4 (recirculating 70c water) my RAPT panel flashed white and would not show any information or response to the buttons. I then pulled the plug and saw that the power cord had melted.

Talked to my reseller who gave me a new power cord and said we should try with that in first place. Heated up 15l of water to ~70c, pulled the plug and it had already then begun to melt. See attached pictures.

So im waiting for resellers response of changing the unit.
If that happened to two cords, it's likely that one of the blades (the one that goes in the melted holes) is undersized, and not making good contact in the receptacle. High contact resistance is what causes heating and melting like that. Another new cord is very unlikely to fix it.

Brew on :mug:
 
I've had a similar experience during my first batch. While cleaning my BZ 65l gen 4 (recirculating 70c water) my RAPT panel flashed white and would not show any information or response to the buttons. I then pulled the plug and saw that the power cord had melted.

Talked to my reseller who gave me a new power cord and said we should try with that in first place. Heated up 15l of water to ~70c, pulled the plug and it had already then begun to melt. See attached pictures.

So im waiting for resellers response of changing the unit.
I had that experience and ended up changing that cord and the outlet on the unit. The fix going forward has been to unplug the cord from the wall first then unplug it from the unit. I found doing it in reverse can cause shorting/melting.
 
I had that experience and ended up changing that cord and the outlet on the unit. The fix going forward has been to unplug the cord from the wall first then unplug it from the unit. I found doing it in reverse can cause shorting/melting.
Thanks for the advice! I've got confirmed this afternoon that the reseller will send me a new unit.
 
I had that experience and ended up changing that cord and the outlet on the unit. The fix going forward has been to unplug the cord from the wall first then unplug it from the unit. I found doing it in reverse can cause shorting/melting.
There shouldn't be any arcing/melting if the unit is off when you plug/unplug. If there is, that is an indication of a problem with the unit. If only a single unit has this behavior, then it is a defective unit. If all units behave this way, then it is a design problem.

Brew on :mug:
 
There shouldn't be any arcing/melting if the unit is off when you plug/unplug. If there is, that is an indication of a problem with the unit. If only a single unit has this behavior, then it is a defective unit. If all units behave this way, then it is a design problem.

Brew on :mug:
I have yet to find a way to turn the unit off outside of unplugging it from the wall. If you happen to have a method that works outside of that lemme know!
 
I have yet to find a way to turn the unit off outside of unplugging it from the wall. If you happen to have a method that works outside of that lemme know!
I don't have one of these, but am familiar with designing electrical systems. Good design practice requires that when the unit is off, it should not draw any current from the structure power source. Arcing happens when current is flowing while being unplugged, or starting to flow as soon as plugged in. Having a plug be the "On/Off" switch is a substandard design, IMO.

Brew on :mug:
 
Thanks for the advice! I've got confirmed this afternoon that the reseller will send me a new unit.
Unfortunately for me, warranty is apparently at the discretion of the seller, and where I bought from is refusing to replace my melted down Brewzilla. I'm looking around at other AIOs, but keep getting drawn back to the feature set of the Gen4. However, bursting into flames and the inability to update the firmware on my unit, are not on that list of features.
 
Alright, finally brewed on this thing after having picked it up a month ago. It went…ok?

Is there a way to set a delayed start? I set everything up last night and then realized I didn’t see an option for this. Maybe a profile where the first step is to wait 8 hours?

Also, I replumbed the spigot to bypass the pump, as suggested in the user guide. After a near boil over (I learned to turn down the heater from 100% after I get to boil), the recirculating arm stopped working. Ok, maybe it’s clogged, I thought to myself. Good thing I replumbed to bypass so I can still drain from the spigot. Finished the boil, cooled it down, got my fermenter underneath, opened the spigot and…..nothing. So I need to clean it up and figure out what happened but curious if this has happened to anyone else?
 
Last edited:
Alright, finally brewed on this thing after having picked it up a month ago. It went…ok?

Is there a way to set a delayed start? I set everything up last night and then realized I didn’t see an option for this. Maybe a profile where the first step is to wait 8 hours?

Also, I replumbed the spigot to bypass the pump, as suggested in the user guide. After a near boil over (I learned to turn down the heater from 100% after I get to boil), the recirculating arm stopped working. Ok, maybe it’s clogged, I thought to myself. Good thing I replumbed to bypass so I can still drain from the spigot. Finished the boil, cooled it down, got my fermenter underneath, opened the spigot and…..nothing. So I need to clean it up and figure out what happened but curious if this has happened to anyone else?
When you say bypass, what do you mean? (To me, bypassing the pump means the pump and recirc are no longer connected. Maybe you mean the tee is on the suction side?)

People (myself included) have had luck blowing back into the recirc to unclog the pump line. Obviously this only works hotside, but I just don't let recirc stop during cooling. (Last batch I recirc'd into a hop spider to collect debris.)
 
Last edited:
Yeah, I don’t think I was super clear. I was referring to this page from the user guide that suggests modifying the connections under the unit to route to the spigot first, and then the pump, the thought being if the pump gets clogged, you can still use the spigot. I couldn’t use either, but after emptying everything out and pulling up the false bottom, There was hop debris all over the place. I’m guessing maybe something got sucked back up through the recirculation arm around the time of the boil over and hop debris got sucked up and pushed out the reverse side, and then clogged the inlet at the bottom of the unit.
 

Attachments

  • IMG_1346.png
    IMG_1346.png
    3.5 MB · Views: 0
Yeah, I don’t think I was super clear. I was referring to this page from the user guide that suggests modifying the connections under the unit to route to the spigot first, and then the pump, the thought being if the pump gets clogged, you can still use the spigot. I couldn’t use either, but after emptying everything out and pulling up the false bottom, There was hop debris all over the place. I’m guessing maybe something got sucked back up through the recirculation arm around the time of the boil over and hop debris got sucked up and pushed out the reverse side, and then clogged the inlet at the bottom of the unit.
Are you using the pump duty cycle feature? I've heard the recirc arm can backfeed the pump during the off cycle if there's no air gap on the outlet. (I use the ball valve if I want reduced flow.)

Also the T is a likely place for a clog, as it has a low velocity branch to deposit sediment, and the physical shape gives a clog something to cling to. I'm on the verge of totally disconnecting the spigot as I've found I don't use it. In an emergency I guess I'd break out the ole auto syphon.
 
I have been having issues with Mash temp overshoots. @KegLand I'm using PID with the bluetooth thermometer. Should I try disabling PID?

My setup is

110V 9 gallon Brewzilla Gen 4
Neoprene Jacket kit
HED
Bluetooth thermometer

I'm running the heating element at 100% during the mash and have PID enabled. I also am recirculating the mash.
 
Apologies if this Notification-related question has previously been answered - I did search this thread but didn't see an answer for my specific symptoms...

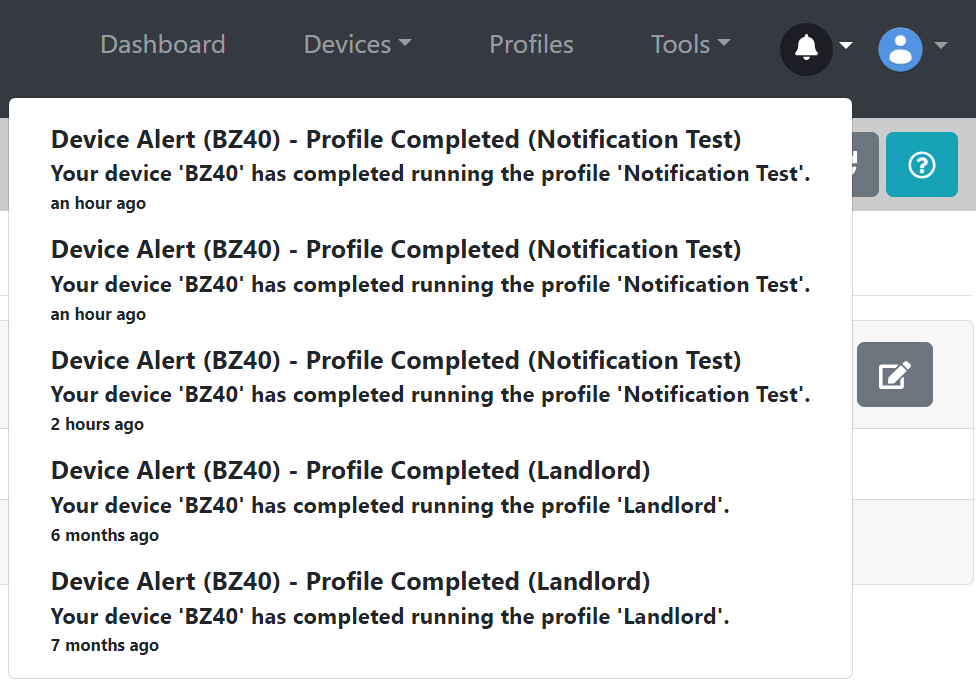
I've had my BZ4 for quite a while now but only just now decided to try using Alerts. I have a "real" profile I created as well as a simple one just for testing the Alert/Notification functionality. On either one, the only alerts I receive are for the completion of the profile - none of the alerts I've defined within the profile steps appear to be doing anything. Not only am I not getting them via email or mobile app alerts, but they also aren't registering anything within the portal, as shown here:
1689868708052.png


Is there something in configuration that I may have missed? Alert definition in the profile steps looks very straightforward. The BZ4 was upgraded to latest firmware last night.

Thanks,
Richard
 
Further to my last post, none of my steps defined as "Go to next step when" = "I press a button on the device" are behaving this way. Same with waiting to reach the specified temp before starting the timer - the profile is just blasting through all of the steps without stopping. I've been running these profiles from the browser on my Windows10 VM. I'll next try running the profile from the RAPT iOS app, then from the BZ4 itself.
 
Eventually realized my firmware didn't actually update last night, and when the OTA update failed again tonight I got the apparently common error 5379. Old firmware was from April 2022. After following advice on the RAPT Users Group (Facebook) to fix the OTA update issue and get the update, the profiles (including temp targets and alerts) seem to be working for me now.
 
Eventually realized my firmware didn't actually update last night, and when the OTA update failed again tonight I got the apparently common error 5379. Old firmware was from April 2022. After following advice on the RAPT Users Group (Facebook) to fix the OTA update issue and get the update, the profiles (including temp targets and alerts) seem to be working for me now.
Any chance that you could repeat that top secret information here? It's locked away in a private Facebook group, making it impossible for those of us who don't want a Facebook account to get support.
 
I've had a similar experience during my first batch. While cleaning my BZ 65l gen 4 (recirculating 70c water) my RAPT panel flashed white and would not show any information or response to the buttons. I then pulled the plug and saw that the power cord had melted.

Talked to my reseller who gave me a new power cord and said we should try with that in first place. Heated up 15l of water to ~70c, pulled the plug and it had already then begun to melt. See attached pictures.

So im waiting for resellers response of changing the unit.

Yes unfortunately we have seen this a couple times. Its not common but we have spoken with the IEC cord and plug manufacturers and the advice we have been given is that the plug and cord need to be firmly pushed together. With high amp applications in particular it is important that they are firmly pushed all the way into each other. I really wish the IEC standard was written in a different way so we had a different way to secure the two sides together.

Obviously one way to resolve this is just to hard wire the cable into the brewery but this is also not very convenient for customers and the majority of customers still prefer the IEC cable as it's handy to pack the brewery down and be able to disconnect the cable. So overall I think the IEC cable is the better way to go.
 
I have been having issues with Mash temp overshoots. @KegLand I'm using PID with the bluetooth thermometer. Should I try disabling PID?

My setup is

110V 9 gallon Brewzilla Gen 4
Neoprene Jacket kit
HED
Bluetooth thermometer

I'm running the heating element at 100% during the mash and have PID enabled. I also am recirculating the mash.

If you use the Bluetooth thermometer and you want to continue using PID you will be required to completely change the PID settings. The PID settings using the inbuilt thermometer at the bottom of the boiler and the Bluetooth thermometer in the core of the malt pipe will be completely different.

With that said if you are using the bluetooth termometer in my opinion PID is not necessary at all.

With the bluetooth thermometer the only thing you really need to do is setup the pairing and then set your desired "sensor differential".

When you say "overshoot" it's important to get an understanding of what you mean by this. The whole ideal of the sensor differential and the Bluetooth probe is it specifically allows the temperature at the bottom of the brewery to overshoot and get hotter than your desired mash temp so you can achieve your desired mash temp faster. This is the reason you would set the "sensor differential"

The sensor differential is the amount you are specifically setting how much "overshoot" you accept. The higher the overshoot you accept the faster you can conduct step mashes and faster you can hit the core malt pipe temp. I personally get good results with a 10C sensor differential value.
I'm going to try turning off PID this weekend. By overshoot I mean the bluetooth thermometer is overshooting by a good 8-10F. So much so I've been having to pull the recirculation hose and splash it on top of the grain bed for 10 min or so to cool it down to the actual mash temp. I'll definitely try disabling PID this weekend and see what happens. As always I really appreciate the help!

PS The differential is currently set to 20F I believe. It's either 20F or 25F.

It might be worth you checking a few settings. The 20F or 25 F for the sensor differential is fine.

I would also set the temp hysteresis to about 1F or 2F Max
I would make sure that the bluetooth probe is correctly paired
I would make sure that you go into the "Temperature sensor" setting and select the bluetooth termometer not "Built In" thermometer
I would turn of PID unless your are willing to go through the PID tuning process. Please note that if you change the conditions (larger mash, faster/slower recirculation rate, different percentage of cooling power) then you need to re-tune the PID. There is no such thing as a good PID settings that work well for varying conditions which is something that I think a lot of customers do not really understand and it's why we recommend most customers not to use PID as they can't be bothered learning how to tune a PID.
 
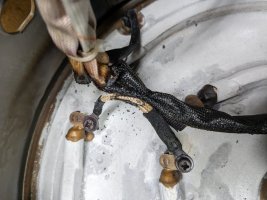
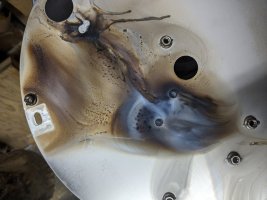
So in case anyone is interested - I finally got motivated enough to do a postmortem on my melted Gen4. (As a reminder - it was plugged in with the heater turned off, but after a power failure it turned the heaters on all by itself.)

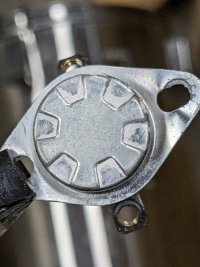
Accessing the thermal cutout took a bit of work, since everything under the kettle had to be removed first.
ThermalCutout.jpgThermalPaste.jpg
The thermal cutout probably did its job, since it failed permanently open, likely due to the extreme heat. The thermal paste connecting it to the heater plate had turned to chalk. What mystifies me is that instead of being in series with the 12V coil supply to the heater relays on the circuit board, the thermal cutout is connected only to the external controller - which happens to be the very device that suddenly decided on its own that dry firing the heaters was such a great idea.

The protective sheathing on the wires going to the heater plate is charred but it isn't crumbly under the char. The insulation on the wires underneath looks okay. (The sheath charring had a rather dramatic effect on the inside of the bottom cover plate.)
WiringHarness.jpgCoverPlate.jpg

I wondered if the extreme heat would have had any effect on the heater plate seal, but the kettle still holds water just fine. I'm really waffling on what to do with this thing now. Finding out that there is no warranty on defective units was an expensive surprise, so I'm hesitant to abandon it. It looks like all I would need to do to get it operational again is figure out a way to mend the melted plastic feet on the circuit board enclosure. I would also probably add a switch for the heater AC power. I doubt I'd run it unattended again after this. However the nights where I used to pre-heat the strike water were likely low risk. After losing its mind, it would have to boil away all that water before firing dry.
View attachment 825733MeltedFoot.jpg

Pillaging it for parts would gain only a pump, a ball valve and a few fittings. I'd have to abandon the deluxe lid, but I could re-use the steam condenser. It's tempting, and the modular brew rig religion has gained a new convert, but we'll see.
 
So in case anyone is interested - I finally got motivated enough to do a postmortem on my melted Gen4. (As a reminder - it was plugged in with the heater turned off, but after a power failure it turned the heaters on all by itself.)

Accessing the thermal cutout took a bit of work, since everything under the kettle had to be removed first.
View attachment 825735View attachment 825736
The thermal cutout probably did its job, since it failed permanently open, likely due to the extreme heat. The thermal paste connecting it to the heater plate had turned to chalk. What mystifies me is that instead of being in series with the 12V coil supply to the heater relays on the circuit board, the thermal cutout is connected only to the external controller - which happens to be the very device that suddenly decided on its own that dry firing the heaters was such a great idea.

The protective sheathing on the wires going to the heater plate is charred but it isn't crumbly under the char. The insulation on the wires underneath looks okay. (The sheath charring had a rather dramatic effect on the inside of the bottom cover plate.)
View attachment 825737View attachment 825732

I wondered if the extreme heat would have had any effect on the heater plate seal, but the kettle still holds water just fine. I'm really waffling on what to do with this thing now. Finding out that there is no warranty on defective units was an expensive surprise, so I'm hesitant to abandon it. It looks like all I would need to do to get it operational again is figure out a way to mend the melted plastic feet on the circuit board enclosure. I would also probably add a switch for the heater AC power. I doubt I'd run it unattended again after this. However the nights where I used to pre-heat the strike water were likely low risk. After losing its mind, it would have to boil away all that water before firing dry.
View attachment 825733View attachment 825734

Pillaging it for parts would gain only a pump, a ball valve and a few fittings. I'd have to abandon the deluxe lid, but I could re-use the steam condenser. It's tempting, and the modular brew rig religion has gained a new convert, but we'll see.

Makes me think twice considering I left mine alone all day while at work so the water would be hot when I got home. Mine had also dry fired the heating elements on its own the very first time I used it but has behaved ok since then. On an unrelated (but maybe not) thought, my Gen4 takes about 45-60 min to get from mash temp to boil. Is that normal?
 
Makes me think twice considering I left mine alone all day while at work so the water would be hot when I got home. Mine had also dry fired the heating elements on its own the very first time I used it but has behaved ok since then. On an unrelated (but maybe not) thought, my Gen4 takes about 45-60 min to get from mash temp to boil. Is that normal?
Depends on your strike volume and if you’re using 110v or 220v. If you’re doing full volume on 110 that doesn’t seem unreasonable.
 
I'm taking roughly 6.75 - 7 gal from ~153 mash temp to boil on a 110v system. Don't get me wrong, I like the Gen4. But that ~hr wait from mash to boil is my only gripe. I could drain it to a pot and heat it on the propane but that just adds something else to clean. Was just wondering if that is normal.
 
So in case anyone is interested - I finally got motivated enough to do a postmortem on my melted Gen4. (As a reminder - it was plugged in with the heater turned off, but after a power failure it turned the heaters on all by itself.)

Accessing the thermal cutout took a bit of work, since everything under the kettle had to be removed first.
View attachment 825735View attachment 825736
The thermal cutout probably did its job, since it failed permanently open, likely due to the extreme heat. The thermal paste connecting it to the heater plate had turned to chalk. What mystifies me is that instead of being in series with the 12V coil supply to the heater relays on the circuit board, the thermal cutout is connected only to the external controller - which happens to be the very device that suddenly decided on its own that dry firing the heaters was such a great idea.

The protective sheathing on the wires going to the heater plate is charred but it isn't crumbly under the char. The insulation on the wires underneath looks okay. (The sheath charring had a rather dramatic effect on the inside of the bottom cover plate.)
View attachment 825737View attachment 825732

I wondered if the extreme heat would have had any effect on the heater plate seal, but the kettle still holds water just fine. I'm really waffling on what to do with this thing now. Finding out that there is no warranty on defective units was an expensive surprise, so I'm hesitant to abandon it. It looks like all I would need to do to get it operational again is figure out a way to mend the melted plastic feet on the circuit board enclosure. I would also probably add a switch for the heater AC power. I doubt I'd run it unattended again after this. However the nights where I used to pre-heat the strike water were likely low risk. After losing its mind, it would have to boil away all that water before firing dry.
View attachment 825733View attachment 825734

Pillaging it for parts would gain only a pump, a ball valve and a few fittings. I'd have to abandon the deluxe lid, but I could re-use the steam condenser. It's tempting, and the modular brew rig religion has gained a new convert, but we'll see.

Is this being run on the 110v or 220v supply? I have not seen this happen before even when we have done dry boil testing here. During the R&D process we repeatedly dry boiled the BrewZilla Gen 4 dry to intentionally abuse the elements and normally the boil dry would trigger before any burn marks like this would happen so it seems different to our testing.

With that said the parts are not expensive to replace. So even if it's out of warranty then it's not expensive to fix. Normally if it's only a bit out of warranty we would just replace it anyway but that decision is for our distributors.
 
Makes me think twice considering I left mine alone all day while at work so the water would be hot when I got home. Mine had also dry fired the heating elements on its own the very first time I used it but has behaved ok since then. On an unrelated (but maybe not) thought, my Gen4 takes about 45-60 min to get from mash temp to boil. Is that normal?

By the way we have changed the firmware now so when you get a new unit and turn it on the elements do not come on straight away.
 
Is this being run on the 110v or 220v supply? I have not seen this happen before even when we have done dry boil testing here. During the R&D process we repeatedly dry boiled the BrewZilla Gen 4 dry to intentionally abuse the elements and normally the boil dry would trigger before any burn marks like this would happen so it seems different to our testing.

With that said the parts are not expensive to replace. So even if it's out of warranty then it's not expensive to fix. Normally if it's only a bit out of warranty we would just replace it anyway but that decision is for our distributors.
This is a 110V Gen4 35. It was 10 months old when it failed. At purchase I didn't pay attention to the warranty, and didn't realize that there was no manufacturer warranty. The place I bought it from has a parts-only warranty. They suggested that I claim this under my home insurance - something I have no intention of doing, since it would likely increase my monthly premium. The parts listed on their web site don't show a circuit board enclosure or a heater wiring harness, and I would never feel comfortable with the existing controller and the firmware on it (which won't update).
 
It might be worth you checking a few settings. The 20F or 25 F for the sensor differential is fine.

I would also set the temp hysteresis to about 1F or 2F Max
I would make sure that the bluetooth probe is correctly paired
I would make sure that you go into the "Temperature sensor" setting and select the bluetooth termometer not "Built In" thermometer
I would turn of PID unless your are willing to go through the PID tuning process. Please note that if you change the conditions (larger mash, faster/slower recirculation rate, different percentage of cooling power) then you need to re-tune the PID. There is no such thing as a good PID settings that work well for varying conditions which is something that I think a lot of customers do not really understand and it's why we recommend most customers not to use PID as they can't be bothered learning how to tune a PID.
I will be testing these settings this afternoon with a multistep mash. Thank you for the continued support!
 
Another question. What percentage should I have the burner set to during mashing on the 110v 9.25 gallon model? I've been leaving it at 100%
 
There is no such thing as a good PID settings that work well for varying conditions which is something that I think a lot of customers do not really understand and it's why we recommend most customers not to use PID as they can't be bothered learning how to tune a PID.

My previous eBIAB using an Inkbird PID controlled a RIMS had an "Autotune" feature. When enabled, it would run through a few heating/cooling cycles to 'learn' how to best maintain temps, usually within 5 minutes or so. Once done, it would hold within 0.5F, sometimes better with amazing stability. I never needed to learn how to tune the PID and it worked very well.

Is something like that not an update option with a Gen4 BZ?
That would be amazing!
 
Another question. What percentage should I have the burner set to during mashing on the 110v 9.25 gallon model? I've been leaving it at 100%
I've found 25-30% works great for smaller (~10lbs) mashes in warm weather. I bump it up if it's cold out or very large mash. (I have the neoprene jacket.)

edit: maybe large mash doesn't need more heat, come to think of it. Depends on conductive vs condensation heat transfer at sidewalls. I'm less certain than I thought.
 
I'm taking roughly 6.75 - 7 gal from ~153 mash temp to boil on a 110v system. Don't get me wrong, I like the Gen4. But that ~hr wait from mash to boil is my only gripe. I could drain it to a pot and heat it on the propane but that just adds something else to clean. Was just wondering if that is normal.
Minimum time to heat 7 gallons 59F with a 1500W element is 40.3 minutes. With losses, about an hour is roughly right. Maybe slightly slow.

Do you have the insulating jacket? Helps especially in cold weather.

Do you set the temperature to 220F+ to boil? If PID is on, setting to 212F will slow down as you approach boiling.

edit2: got the lid on?

edit: T = 60 * F * G * 8.34 / (W * 3.412)
T is time in minutes
F is delta temperature in degrees F
G is gallons
W is element wattage
60 minutes/ hour
8.34 lbs per gallon h2o
3.412 btu/hr per watt
 
Last edited:
Minimum time to heat 7 gallons 59F with a 1500W element is 40.3 minutes. With losses, about an hour is roughly right. Maybe slightly slow.

Do you have the insulating jacket? Helps especially in cold weather.

Do you set the temperature to 220F+ to boil? If PID is on, setting to 212F will slow down as you approach boiling.

edit2: got the lid on?

edit: T = 60 * F * G * 8.34 / (W * 3.412)
T is time in minutes
F is delta temperature in degrees F
G is gallons
W is element wattage
60 minutes/ hour
8.34 lbs per gallon h2o
3.412 btu/hr per watt
That is great info, thank you.

Yes, I have the jacket and I do leave the lid on until it gets to boil then take it off. I usually set the temp to 218-220. PID is off. Outside temps are 95+
Been thinking about getting a heat stick to see if that would help speed it up.
 
That is great info, thank you.

Yes, I have the jacket and I do leave the lid on until it gets to boil then take it off. I usually set the temp to 218-220. PID is off. Outside temps are 95+
Been thinking about getting a heat stick to see if that would help speed it up.
FWIW, the 120V gen4 is 1500W, so there's another 900W available on a 20A 120V circuit before it's overloaded*. If you have another circuit available, you could exceed that.

*"Continuous" loads are only supposed to be 16A on a 20A circuit. Tank water heaters are considered continuous, so one might argue any tank with an element might be. You're not guaranteed that a 20A breaker won't trip if loaded over 16A for a prolonged period, particularly if the panel is somewhere hot (e.g. garage). Also, it may not trip for a while if overloaded slightly, but you may be overloading your wires. Standard (thermal-magnetic) breakers are not very precise. Best to pay attention to loads.
 
Back
Top